From Idea through Theory to Reality
For quite some time I wanted to make a bathroom cabinet, but never really got around to do it. I could of course have taken the easy way out by going to IKEA and buy a flat-pack. Though I'm Scandinavian, I'm not really an IKEA kind of guy. It's all a little to square for my taste.
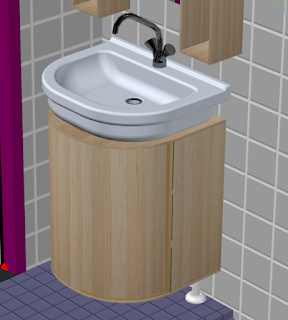
I finally got the finger out - So I fired up AutoCAD and started designing a bathroom cabinet that fitted my quirky taste.
To be clear - I'm neither a designer, nor a vizard when it comes to creating 3D renderings, but I do enjoy the process of creating and building - and I have a lot of fun doing it. Isn't that the most important thing?
 |
| The cabinet as rendered in AutoCAD |
 |
| And the reality. Just needs a lick of paint so it can handle the bathroom environment. |
Errors were made, struggles was fought, frustration ran high at curtain moments. Building the curved doors was probably the bigger challenge.
I don't own a lot of woodworking tools and I do all the building work in my living room, so I decided to use GAMMA's woodcutting service for some of the wood. They did a brilliant job. The wood was cut precise and had a very nice finish.
To help me getting through the build I bought myself a new Jigsaw - that was a lifesaver as I needed quite a few curved pieces of wood - and GAMMA's service is still quite limited in what they can make.
The cabinet is build from 3 mm multiplex for the sides and doors. 9 mm multiplex for the bottom, shelf and top. The inner construction is made from 27 * 27 mm pinewood.
The idea was to bend the multiplex for the doors around some curved pieces of pinewood, but the 3 mm multiples was quite a bit more stiff than I had expected, so I had to give up on that. Fortunately I did have some 2 mm birch multiplex from an other old project and there was just enough for the doors. The did result in two different wood types (as can also be seen in the photo above) Also, because the birchwood was thinner (only by 1 mm) I did have to make some minor adjustments here and there.
because of the two different wood types, I'm probably going to paint the sides plain white and leave the doors with clear coating so you can see the birchwood finish.
The following is just a bunch of snap-shots taken during the build.
 |
| The "skeleton" is done. That was the easy part. |
 |
| The cutout for the sink took quite some measuring. I did 3D printed a helping tool to transfer the shape of the sink. That removed some of the guesswork and I could finally get to use my new Jigsaw. |
 |
| The shelf was easy finished using the Jigsaw. |
 |
| The framework for the first door is ready. |
 |
| Starting to clue up the door, this was the easy part. |
 |
| Continuing the glue up. I had to do this in small steps as I didn't have enough clamps to do it in one go. |
 |
| The first door is ready. |
 |
| The second door went a little more smoothly than the first. Mainly because I learnt from the mistaken made on the first. |
 |
| Both doors are ready - and a still have all me fingers (and a few splinters) |
 |
| View from the back. Nearly looks like a chair from the 1930's. Maybe that could be my next project... |
 |
| The, nearly finished, cabinet. It fits in the allocated spot with only a few millimeters to spare. Next step. Going the whole lot with filler and sanding it down to prepare it for painting. |
